StarHub Happy Roam for my Taiwan Trip

Disclosure: Although I work in StarHub, I do not work in Marketing, Sales or the Prepaid product team. I have no personal vested interest in the prepaid product, I paid for the prepaid card with my own money and nobody in the company asked me to write this. I am writing this as an original content for my personal blog and also because out of my 5 trips to Taiwan, this is the first time I did not buy their local prepaid card. 

Since this is my 5th time in Taiwan, I’ve gotten pretty sick of queuing at the Taoyuan International Airport and having to present 2 photo IDs in order to sign up for a Taiwan prepaid card. It didn’t help that one traveller is only entitled to purchase 1 prepaid card. This had me scrambling to collect 2 photo IDs from each family member in order to get a prepaid card for each of them. Cost wise, a 10-day unlimited prepaid data plan from Chunghwa Telecom costs $500 NTD (~S$22.70).

In the past, roaming data charges had been prohibitively expensive for casual travellers like me. Although I’m not in ops, I’ve been hearing about how affordable (planned) data roaming can be so I’ve convinced myself to give this a try.

I have a choice between Data Travel and Happy Roam. Without going into the specifics of both, I can highlight that Data Travel is more convenient as you can use your existing StarHub postpaid SIM to roam in a controlled manner. Downside is, the price is a tad more expensive at 2GB/30days/$15 (Data Quota / Validity / Price) compared to Happy Roam’s 1GB/3days/$5. The minor inconvenience for Happy Roam is that you need to get a StarHub Happy Prepaid card.

For me, personally, I’ve already had the intention to plug a SIM into my Mobile Wi-Fi device anyway so an additional SIM means I don’t have to remove my current SIM from my iPhone.

For that reason, I decided to go with Happy Roam. Researching deeper, I found that the Data quota is stackable – I can pay double of $5 to get double the data and double the validity period. This can be stacked all the way to 10GB/30days/$50 as shown in this table below:

Data Quota Validity Price
1GB 3 days $5
2GB 6 days $10
3GB 9 days $15
4GB 12 days $20
5GB 15 days $25
6GB 18 days $30
7GB 21 days $35
8GB 24 days $40
9GB 27 days $45
10GB 30 days $50

Since my prepaid card came with a promotional free 5-day 15GB local data, I did not have to worry about credits depleting due to background data usage just because I put it into a smart phone. If yours does not come with promotional free local data for the first X days, remember to turn off mobile data before inserting the prepaid SIM!

To manage your data usage while overseas, download and install the Happy Prepaid App

IMG_4527You’ll be prompted to enter your Prepaid number and confirm the OTP that is sent to that number. I’ve noticed instances where OTP isn’t required such as when the prepaid SIM is inserted in the same phone that is running the app. Once authenticated, you can go ahead and purchase the plan.

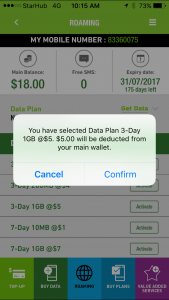
Purchase the plan 3 times if you need 3GB. For me, I had to purchase 5GB despite free Wi-Fi at most of my accommodation in Taiwan since I’m such a heavy social media user.

Do remember to check your balance regularly so that you have ample time to top up and add on an extra GB or 2 if necessary.

Conclusion

The following list of Pros and Cons are solely judged based on my trip to Taiwan.

Pros

  • Skipped the queue at the airport. I was able to get online right after touch down before even arriving at the gate.
  • Price comparable or even cheaper compared to a Taiwanese prepaid SIM if your data usage is 5GB or lesser.

Cons

  •  I had to monitor my data usage carefully on the StarHub prepaid SIM as it is not unlimited like the local Taiwan prepaid plans.
  • There’s a hassle to switch out my original SIM with this new prepaid SIM unless I’m using an external Mi-Fi device.

In the end, I used more data than I expected and had to top up another 2GB on top of my budgeted 3GB but that’s my problem. I would use Happy Roam again definitely if I’m heading to a country where I foresee myself not being able to (or want to) queue at the airport telco counter.

DIY 100% Natural Insect Repellent

diy-insect-repellent

Seeing insect repellents flying off the shelf and then realising that people are reselling them on Carousell, I decided that enough is enough.

I needed something as effective as Deet but 100% natural for my pregnant wife so I did some research on homemade insect repellents.

I realised that Citronella oils are not as effective as I thought and the only natural essential oil that is as effective as Deet is Lemon Eucalyptus oil!

The problem is, you shouldn’t apply Lemon Eucalyptus oil directly on your skin as it is too strong in its pure form. You would want to mix it with something that is soothing and calming on the skin (astringents) and Witch Hazel is the natural choice. Of course, if you prefer, you can use cooking oil or denatured alcohol but I would really recommend Witch Hazel.

The last ingredient is Vanilla Extract. This is optional but recommended because some people don’t like the smell of Witch Hazel!
diy-homemade-mosquito-repellent-singapore
Now here comes the most important part – putting them altogether. I bought pump spray bottles from Daiso but you can find them elsewhere. I would recommend glass ones if you can find them.

– 120ml Witch Hazel
– 30 to 40 drops of Lemon Eucalyptus oil
– 1 tsp of Vanilla Extract (Optional)

Mix them up and transfer them to pump bottles. The mixture dry up really fast on contact with skin and is good for several hours.

Review: NoseFrida Snotsucker Nasal Aspirator vs Lucky Baby Easi Clear Infant Nasal Aspirator

HJ's review of the Nosefrida Snotsucker and the Lucky Baby Easi Clear Nasal AspiratorFor the past week, Emma has been rejecting her milk just after one sip and it took lots of coaxing and crying on her part to even  finish half of what she used to take. The last straw came when she wailed in hunger inconsolably and we rushed down to the only PD that is willing to take in last minute patients close to their closing time.

From our description, the PD immediately diagnosed Emma with having a badly blocked nose. Consequently, she was unable to breath whenever she is drinking milk, leading to her crying and rejecting the milk altogether.

When we got home, we got our bulb-type nasal aspirator where you squeeze the large bulb to force air out and release to create a suction effect at the tip. That’s useless. The suction is not sufficient to suck out the mucus from her nose.

In the end, we saw our friends recommending the NoseFrida Snotsucker so we went online to purchase it. I stumbled upon it on Lazada SG so I thought heck, why not search and see if there’s a cheaper option. We saw the Lucky Baby Easi Clear which is also a mouth-powered version at only $6.90 compared to $22.90 for the NoseFrida! Curiosity got better of me. Instead of saving money, I ended up ordering both. I wanted to see which is better.

Lucky Baby Easi Clear

For the Lucky Baby Easi Clear, it is made up of two flexible tubes with one white (soft) tip (for the nose) at one end and a mouthpiece on the other end. The soft tip is very important as it gentle and doesn’t jab your baby’s nose. There is a larger round “junction” where the two tubes meet indirectly so that air pressure differences can be exchanged with lesser chance of the mucus passing over to the tube that you are sucking. Clever!

Usage wise, it is pretty effective for sucking out all the mucus from Emma’s nose. As I shared, the soft tip is really important and Emma was not too traumatised when I placed the white tip on her nostril. The tubes were a bit short but that’s fine because a long tube would make sucking more difficult! The only thing I don’t like is that the soft tip is too small for me to grip properly when trying to position it on her nostril.

Pros: Cheap, effective, soft tip allows gentle “anchoring” to the nostril

Cons: Plain looking, not so flexible tubes, small tip offers insufficient grip


NoseFrida
NoseFrida Snotsucker

The NoseFrida is quite expensive at S$22.90 for such a simple looking thing but many people swear by it.

Basically you suck on the red coloured mouthpiece and aim the tip of the blue test-tube looking thing at your baby’s nostril. I found this device much simpler than the Lucky Baby one yet it is so much more expensive!

It does the job as effectively but the lack of the isolation junction made it necessary for a disposable sponge filter to be installed at the end of the blue tube. I’m not a fan of having to buy parts for an already expensive device in the first place. The good thing about the NoseFrida is the large blue tube allows excellent grip when you need to aim on the nostril of a struggling baby. The bad thing is of course that, while the tip has no sharp edges, it can be uncomfortable for the little one to have this shoved on his/her nostril when struggling.

Pros: Good Grip, Good mouthpiece

Cons: Expensive, tip is not soft, have to replace sponge filter eventually

Emma's snot =D
Emma’s snot =D

Conclusion! Buy both. You need two anyway. I pop one in the diaper bag and one at home. It is important to have two because you’ll find yourself needing this urgently at some point. Don’t be afraid to grab a couple of the Lucky Baby Easi Clear though. It’s so cheap!

Buy here: